How To Drive Fast is the second new regular feature on Axis. We found ourselves never quite satisfied with many of the "how to" guides out there on the internet, usually they are way too generic and written perhaps for an audience with less experience than what is the average Axis tracktard reader.


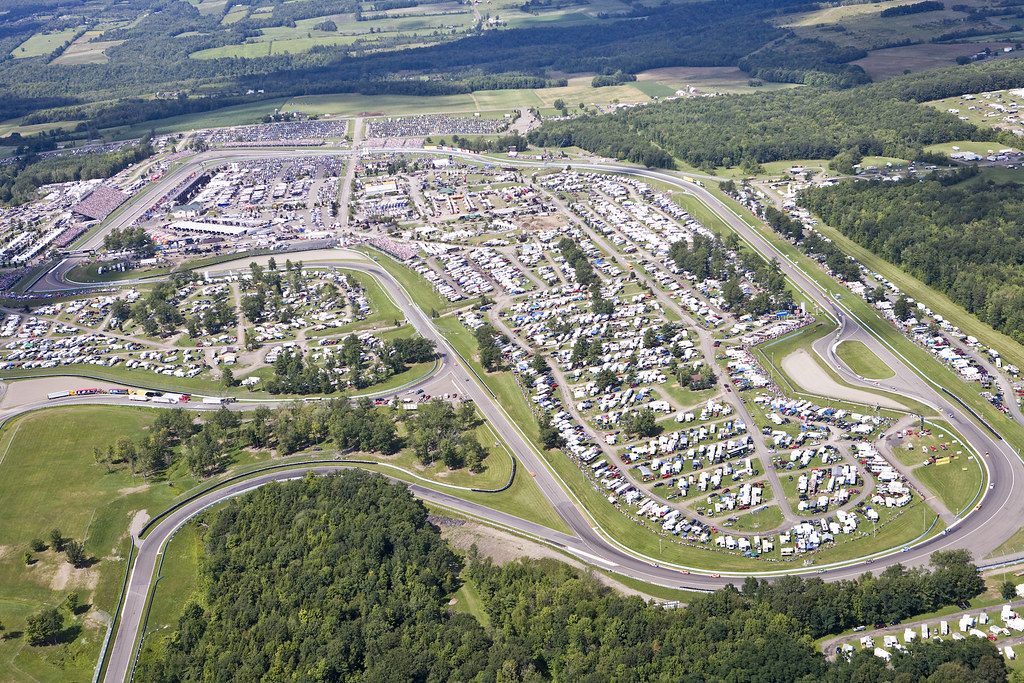
The logical first choice was always Watkins Glen, the historic home of the US Grand Prix built in the late 1950s on a plateau above Seneca Lake in upstate New York.
People always talk about how the Nürburgring has no runoff, the Glen's baby blue Aarmco is looming just as close, ready to ruin your day.
It takes skill and attributes to go fast here, The Glen is a Power track but the key to being fast here is having the right setup to carry big speed though the famous "Esses" and still being good though the medium speed turns on the far side of the track.
 For this first installment we spoke with Dan Clarke who hails from the UK and has raced open wheels in Champ Car, Indy Lights, Formula Ford, Formula 3 and tin tops wit in NASCAR Nationwide and most recently in the Intercontinental Trophy Series in a Porsche Cayman for Isringhausen Motorsport.
We asked "Speedy" Dan about how he looks at the track and which way he goes with the setup. This is specific to a mid engine Cayman but some aspects are applicable to any layout.
Axis:
Tell us about your setup for the Glen
Dan Clarke:

I make sure I have a bit of extra bump dampening on the rear shocks. This is something I like for highspeed stability at the turn 5 ( the bus-stop) so body roll through the turns doesn't go too far when you through that high speed change of direction.
 |
| Photo Chris Waits/Flickr |

Another thing that may help at the fast turns of Watkins Glen is a bit more rebound dampening on the front to help keep the nose down through the long apex high speed turns. Extra rebound will make it so the front doesn't "pop" back up too soon and give you understeer before you've got the turning done in the car. Resist the temptation to make big changes with the shocks. With a range of 11 full clicks in the Cayman, I'll make 2 click adjustments at a time. This works well for me.

Half the time in racing, trying to get the perfect setup before you even get to the track, can result in having a horrible car once there. It doesn't always work. Go by what you feel after driving it first and remember one of the driver's jobs is to make up for some of the car's inadequacies too. If we weren't able to do that, then the days of computers driving for us would get even closer ;)
Axis: Where are the best places to pass?
DC:
Definitely the main straightaway. Getting a good draft there and passing under braking is one of the easier spots. But it still has its risks, most notably getting a bad exit out of 1 and leading to the guy you just passed getting a run on you upto 5. So make sure you don't compromise your exit when passing into 1.
Another good spot can be into 7. Only because it's an exit from a righthand turn (6), leading to a left turn, so you can keep the gas on harder out of 6 and let the car drift out to the left to be on the inside for 7. Just make sure you don't try to brake late for 7 and pitch the car into a spin turning in to the turn over that crest. Other than that, almost any straightaway could be the right spot when you have that advantage over the car in front.
Axis: Tell us a bit about the ITC Cayman
DC
The ITC Cayman is an easy car to setup. Firstly, the Series doesn't want to outprice itself by allowing too much expensive "race" parts. The 2nd and most important reason it's a great car is the weight distribution. That mid engine platform just screams racing once you're behind the wheel at speed. I can't count the amount of 400-500+hp cars I've been able to drive around with this Porsche Cayman. It really is an underdog car that loves nothing better than to make fools of the horsepower cars out there on a track. It's like a Miata's bigger and tougher brother!
Axis: Great, can you go though the traack turn by turn?
DC

Try to brake at the 300 board. There is good camber at the apex here so carry a bit more speed in than you think. Long straightaway follows so exit is really key so try to get the car rotated early so you can get back to full gas and straight wheel sooner. Stay off inside kerbs but can use the big exit one.

Slight smooth lift back on the gas on entry to get the front to come in and then as soon as it does get back to full gas. Exit a bit further to the right than you think to make turn 3 straighter.

Late apex here. Should be flat on the gas all the way through. Like the exit of turn 2, don’t use all the exit space. Save some to make turn 4 straighter. Keep the speed flowing through this section.

Flat out. No kerbs.

Try to brake close to the 500 board then quickly off the brakes again so the car can be balanced as you drive all wheels straight over the 1st kerb to go as straight as possible. Carry some speed in here but get the car turned in the middle early so you can get back to full gas. Try the 3rd kerb here. Sometimes it’s murder in an open wheel car but it can feel ok and not upset a sportscar. Use 4th kerb too.

I like to roll speed in here and allow engine braking to slow me down in the mid. Initially the entry should feel slightly too fast, then as engine braking brings the front coming back into the turn, and as the track stops falling away, start squeezing that gas pedal down. Use all the track on the exit if you have to.

The track starts going downhill here on entry so make sure you’re not trail braking here or you’ll have an oversteer moment right when you don’t want to. The track gradient also comes back in your favour in the 2nd half of the turn so the key here is to carry in slightly more speed than you think, with brakes released early, and wait for the track to change in the middle of the turn and you will find that extra front grip to allow you to quickly get back to full throttle.

This entry is uphill so you can carry a lot more speed than you think since uphill gradient changes always give more front grip. So roll the car in faster than you think, let it rotate in the middle quickly, and quickly back to full gas as the exit straightaway is still uphill so you don’t want to miss the exit on this turn either and carry a speed deficit all the way to the next turn.

rake just before the 200 board initially hard then ease back as the track falls away and you prepare the car to turn in. Stay off the inside kerb and use all the track on exit.

The track crests on entry so you want to make sure you’re off the brakes early. Roll in more speed than you think because you need patience to wait for the 2nd apex. If you wait for the 2nd apex, your exit will be so much faster since you’ll get to full throttle and straight wheel sooner.

Brake just before 200 board, good camber here to roll in faster than you think. A lot of people over brake for this turn and it kills the car. Use all the exit kerb, Nascar style, if you like too.

A good exit here is the key to passing down the straight. An easy mistake to make is getting to the apex too soon and clambering over the nasty kerb on the inside. Stay off that. Allow the car to apex just a tad later in the turn. Resist the urge to pick up a too early throttle unless you can hold it down from there in out. Run out all over the exit kerbs, up to the wall, for the fastest exit.
We welcome your feedback on how to improve this feature further, maybe add Data if available...
That's how you drive a Cayman fast at the Glen. Check out below some hot and heavy action from our buddy Sean Curran scrapping with the Freep and Robert Grace in Spec e30.
Wow, this is timely- I'll be here in September! Thanks Axis!
ReplyDeleteGreat article! Keep more coming!!!
ReplyDeleteno lift in T2!
ReplyDeleteSetup/car dependent, I think more than "lift" Dan mean "breathe" which he does in the video. I know in my car, with anything less than brand new tires I will do just a tiny adjustment to get the front to set.
DeleteAxis- Great feature, really enjoyed this. Please do as many of these as possible. As a racer it's great to hear other racers share technique and insight into a track.
ReplyDeleteData would be the best and only addition I would want to the feature, however, if the teams / drivers don't want that public it's understandable. I wouldn't give my data to anyone of any track if I was the team / driver even at a club level.
Great article regardless keep it up!
thank you, we have more planned. Hope to have all major US tracks covered as well as some in other countries as well.
DeleteOh cool. One on the Nurburgring would be the typical response you would hear from someone, but how about a feature on Macau? Now thats a track I would love to see in something like this!
Delete